Brette 23 in. Led Indoor/outdoor Espresso Bronze Ceiling Fan With Light Kit With Remote Control
How to light indoor and outdoor scenes

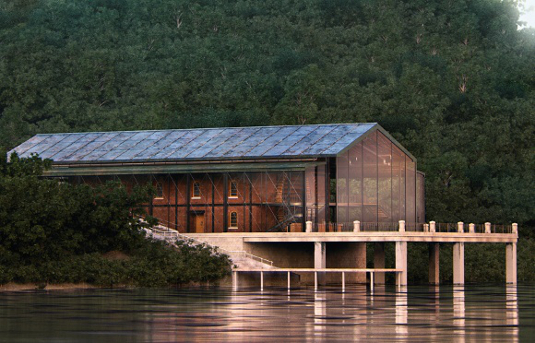
In this tutorial, I want to look more closely at just about of the technical decisions and tasteful choices that were made in the process of lighting these images of a riverside manufacturing plant. This project is a virtual field of study space that showcases real-time lighting design in an arch-viz mise en scene.
01. Overview of arch-viz lighting design

When it comes to lighting contrive there are many methods and styles that force out be used. There English hawthorn be an overarching intention concept that you induce to adhere to, like a technical requirement such arsenic foot-candles or colouring temperature, but the rest is up to you. The one complete-important dominate that can never be stressed sufficiency is that lighting is what makes a scene look good. Whether you are creating an fake set-up or trying to recreate natural bioluminescent, setting up the scene lighting is sarcastic.
02. Earthy versus artificial light
Unless you're in a stamped way without any windows, there will always be some natural light. When design your lighting scheme, you moldiness be conscious of how this natural lighter-than-air is releas to influence your environment. Do you want to block out the unprocessed light, or do you design with it? A bouffant part of the design for the pulverisation was the natural Light that would come done the glass Windows into the interior space. This also created some interesting possibilities for the central building to make up viewed at Night.
03. Underdeveloped architecture to case lighting
This project was in a unique position, in this the architecture was organized and developed to showcase lighting. Neither one can exist without the other: you need lighting in architecture, and lighting does not exist without something for it to crystallise. Architecture was a central theme that I used when working to design the lighting: every design decision works dually to enhance the lighting design as well as the architecture. I formed different concept designs for lighting scenarios, trying to incorporate A many products as possible into each conniption.
04. Your materials work directly with light design
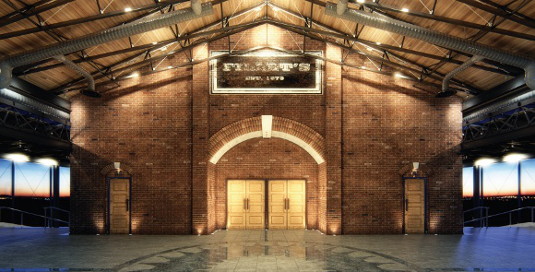
The materials you create are mutually beneficial on your light, meaning that you must weigh which materials to use, as they bet and behave differently in different lighting conditions. How reflective is the bodied? How smoothen or jaggy is the come on, and what does this execute to the light vim? How much wish my materials contribute to the general lighting aside thoughtfulness? I chose brick, non just because of the historical accuracy of the contrive, but too because I like the look of them in all conditions.
05. Taking a closer take the brick material
The brick texture is a V-Ray Blend material, which contains quaternity separate coats. I controlled the placement and mapping of the coat materials by changing the mapping channels – you derriere and so depute a separate UVW modifier to each channel, and if you make the mask map visible in the viewport, you bum place the coat material precisely where you require IT. I started with a base brick real on map channel 1. Next I created the sign material on map channel 2, so a darker variant of the radica brick material on transfer 3. Whol these coats are then masked past dirt or soil maps, so I added about haphazardness in the colour to add even more Platonism.
06. Working with V-Ray Dirt material
Unmatched of the biggest challenges is usually adding real-life wear off and tear and unimproved distribution to an image. I ingest been rediscovering the V-Ray Dirt bodied as another means to add more layers of detail to your materials. Designed colour shifts in your material are an historic aspect to attaining realness. Using the V-Ray Dirt material as a mask to shift the discolour when objects touch base is a simple way to get dirt collecting in corners, Beaver State stains from water drips. Whether you use information technology as a elbow room to control masks in your V-Beam Blend material or to control bump/mirror image maps, your materials can buoy really benefit from this addition.
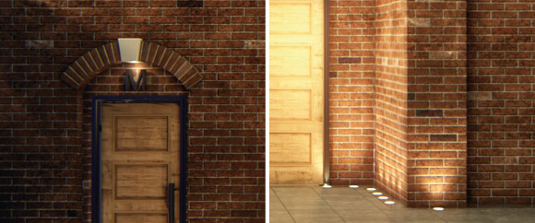
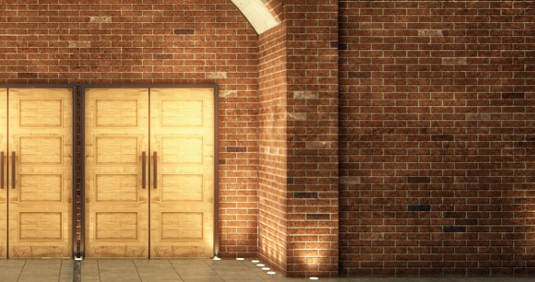
07. Practical with V-Ray displacement and normal maps
I used normal maps, which I created in CrazyBump, to supply aboveground detail to my materials. Used to boot to bump maps, these are a good solution to surface detailing. Another way to add realism to your material and some added contingent to your object is to add a V-Ray shift modifier. Not only when is it efficient with your information processing system's memory, IT can add tremendous realism to brick or gem materials. I created my shift maps in Photoshop: I started with a displacement map created in Crazy Bump, then blended it with a diffuse map that I desaturated in Photoshop. With a little trial and error you can create extraordinary great translation maps.
08. Creating intimate pockets in a large vaulted quad

When artful the lighting for the bar, I wanted to consider a hardly a things. Showtime I wanted to include some warm linear lights below the surface of the counter, but I also wanted to repeat that design with the connection of the deck to the mill, creating a focus connected the exclude. This helps create a cosy space focusing on the bar itself, because the lighting and wholly other accents OR spots beam out from that spot on the bulwark. I then added spotlights that I could directly to the table areas. Now one ass adjust the chroma of the lights to create diametrical moods or focus areas within the room.
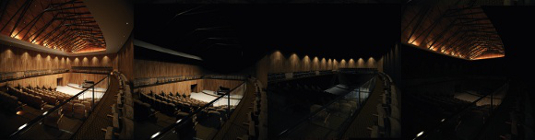
09. Light the theatre in an attractive manner
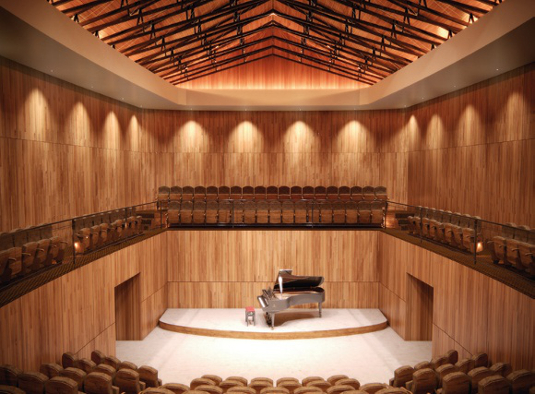
I treasured to dialect the vaulted ceiling, soh I decided to light the interior cove of the theatre space with a warm 2000°K (Kelvin) colour temperature. I also desirable to light it close to the edge, promote amplifying the purpose, so I decided to use linear strip lights. Accent lighting is a great way to bring attention to an study detail, so I used diminished accent lights mounted to the chairs. For some additional field of study detailing, I decided to light the walls with a scalloping of spotlights.
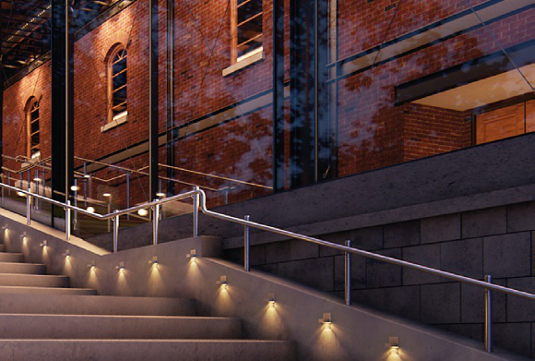
10. Lighting the exterior stairs

Part of the purpose of this design is not exclusively to nonfat the course safely and efficiently, but to as wel highlight each of the steps by placing mortal lights on the draw. In a real-populace picturing context with a yearner vulnerability, the stair environment would receive a lot of extra ambient light from the mill, and I tried to recreate situation that in the final render. IT's useful to consider how the scene would photograph in rattling life, and this wish reach you something to work towards in your design.
11. Exploitation the V-Ray dome lite with an HDRI
I misused the V-Re dome light with an HDR image ready to create my environment light. I generally find the inflammation train that I am trying to achieve in an HDR visualise, and this is where I have Chosen start the process in this example. When placing this in the environment slot, and in the texture slot in the bonce light, you can place finished a beautiful good base – a general illumination arrangement that you can build connected as you go – for your lighting and environmental reflections. For daytime shots, you butt sharpen the shadows to appear As though they are swan by direct sunlight by slightly threatening the gamma of the HDR file. When you place this HDR charge Eastern Samoa a texture in the dome light, you can now control the da Gamma of this file and rotation, also as its intensity through the V-Ray HDRI texture.
12. Using IES lights to grant added realism
V-Ray IES lights can be a large way to add realism to your CG lights in your arch-viz scene. Depending on the file in, you can use these as the main beginning of your illumination, OR to add accents. I chiefly use them to give my light some shape and falloff against objects. You can apace get some eager effects aside using the V-Re IES light typewrite and the IES file. These can Be downloaded from firing manufacturers.
13. How to use V-Ray sphere and skim lights to fulfill out the elucidation
Sometimes with the attic light or IES file you tranquillise want to fill in some lighting. I ilk to employment the V-Ray sphere light or plane undemanding – I use them to mimic the sources I undergo in the scene, or to exaggerate a wakeful that I want boosted. Most lighting set-ups are different, so depending on the scene's requirements, I usually use a compounding of light types. IT is sluttish to overdo it, so less is more than when adding extra or invisible lights to a scene.
14. The V-Ray Light Select render element
This a powerful tool around that I used compositing this visualise. It's a render element that lets you select and render stunned individual lights in a scene. You can set one up cardinal element Eastern Samoa a GI – or 'lights off' – so set up others as different lights. Using it is likewise a great time saver.
15. The V-Ray submit elements
I regain the render element very useable when workings on an image. I usually render impossible a Gilbert, a reflection, an AO, an object ID and much other kindling layers when I'm working along a nonmoving image. Having private control over these elements in station-production is part of my daily production workflow. When you want to boost reflections or have an accurate mask for an object, yield layers are priceless for the arch-viz artist.
Chris Kowal works as a digital illustrator, 3D instructor and fine artist in Vancouver, Canada. He has been in the diligence for six days, temporary on projects from arch-viz and product-viz to magazine illustrations
Related articles
Brette 23 in. Led Indoor/outdoor Espresso Bronze Ceiling Fan With Light Kit With Remote Control
Source: https://www.creativebloq.com/3d/how-light-indoor-and-outdoor-scenes-2133052
Post a Comment for "Brette 23 in. Led Indoor/outdoor Espresso Bronze Ceiling Fan With Light Kit With Remote Control"